Author Topic: gi-joe hip replacement tutorial (strait torso)  (Read 9790 times)

Offline spudafett

  • Mando Master
  • Moff
  • *
  • Posts: 3570
  • Feedback: +7/-0
  • Gender: Male
  • He's no good to me mashed!
    • deviant art
gi-joe hip replacement tutorial (strait torso)
« on: August 11, 2009, 08:46:27 PM »
Ok per doc's request I'm putting up a tutorial on how to do a gi-joe hip replacement on star wars figs. I will try and explain the process as thoroughly as possible with the few wip pictures I have, sorry if it gets confusing.  Any questions anyone has on this I will try to answer.  I will also be trying to get more pictures as soon as I can afford making another figure like this....

 This process was born out of my want for more posable star wars figures and my discovery of the 25th aniversary articulation and body construction.  this is a labor intensive process and you will need several things to get started:

A small diameter plastic rod.  The plastic framing which holds together models works realy well.

You MUST have a dremel with a cutting wheel

either a drill bit for your dremel or a seperate cordless power drill
  -- I have gotten where I realy like using my power drill at a low speed setting for drilling holes in the soft plastic of figures, I have a better control of the drill bit with the slower speed and I can use my finger to guide the piece over the drill bit without fear of driling a hole through my finger with the high speed dremel.... :P

You realy do need to plan ahead on the figures you want to use for this.  Decide on what star wars figure you'd like to super articulate first and go from there:

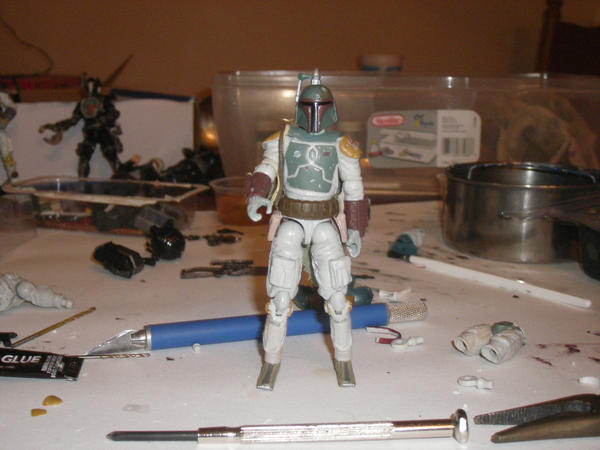
I picked a standard legacy/votc boba fett figure. (this is sadly the only figure I have wip pics for too :( )
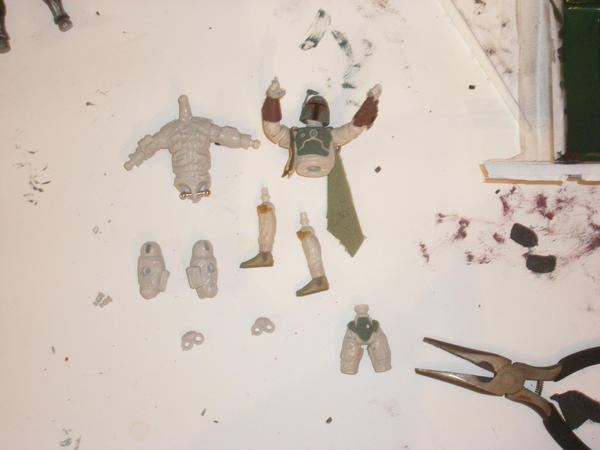
this is what the figure looked like originally:


The gi-joe figure I used for the donor parts was a gi-joe snow viper:


I picked this figure because it's thigh's have similar pouches sculpted on as boba's jump suit has. 

The first thing that needs to be done is to pop open the chest/torso of the fett figure.  I do this by starting out at the bottom and slowly (and very carefully) cutting into the side with an exacto knife.  Work slowly and alternate with each side untill the torso opens up enough to pull out the legs at the waist joint.  There is no need to completely split the body in two but if you do it's fine.

at this point you need to keep all parts of the boba fett figure as we will use them all except for the thighs. 

Move on to the joe fig and start taking it apart.  This is the most labor intensive portion and could get confusing.
here is a picture of the parts that will be saved:


For the figures that don't have ball joints in their torsos you don't need to worry about popping the chest apart on the gi-joe.  This is especially the case if you plan on using the gi-joe's ball jointed neck for making the boba figure have a real head and removable helmet.  This is also assuming that your not going to hit clonehead up for his custom cast necks and heads....  On this particular figure I used a gi-joe head and neck so I'm going to explain the entire process with that in mind.  The same techniques can be applied to swap out the old neck for one of clints or a stock s.w. figure's neck.

The other parts needed for the mod are the gi-joe's thighs and the screws which hold them together.  As well as the double knee joint.  These knee joints are a little dificult to remove.  I use a tiny flat head screwdriver to wedge around the tiny peg and pry the legs off the lower joint of the knee.

The next thing to do is make the new conection between the torso and the hips.  This calls for the dremel's cutting wheel.

Cut the waist of the gi-joe right through his belt area.  Use the belt as a guide and you should get a pretty strait cut around it.  Try not to cut too far below the belt as you will hit the top of the metal making up the ball joints.  Once you have the hips cut off of the joe put them to the side.

Take boba's hips and cut off the "t" peg off just below the peg itself.  you will cut through the entire hip to achieve this.  You will use this peg to attach the new waist.

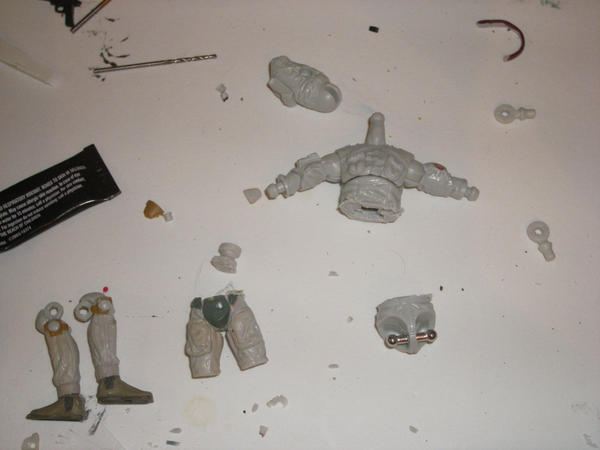
here is what you should have after dremeling off these two pieces:


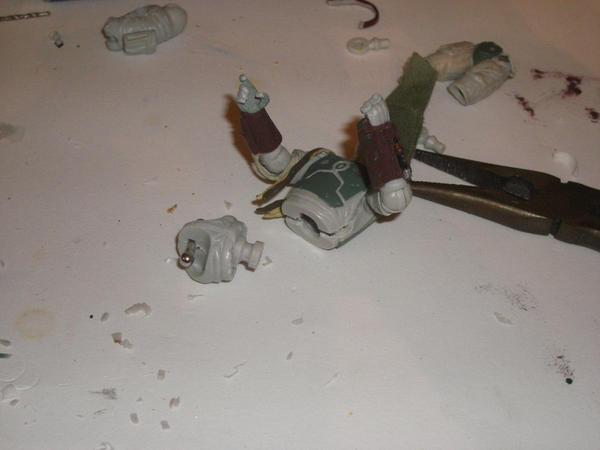
Notice in this picture how I have placed the double jointed knee's onto boba's lower legs?  This is what you need the drill and the plastic rods.  Take your knee joints and make sure the plastic rod you have will fit through the bottom most hole of the gi-joe knee. 

Take the boba fett legs at the knee and carefully cut the peg out.  gently push the exacto blade down on both sides of the old knee joint and remove the existing peg.  Take the gi-joe knee and fit it inside the groove from the old peg and while holding it in place drill a hole through both sides of the leg making sure your drill bit goes through the knee joint's hole as well.  Using a bit that is slightly smaller than the plastic rod is probably a good idea for this part as the plastic of the boba's leg is soft and will expand.  Push the plastic rod through the leg and cut it at a length just slightly long enough to make it all the way through.  Using the soft plastic of the model kit's framing you can take a pair of needlenose pliers and compress the rod to expand both outside ends to keep it from slipping out.    Please ask if this isn't clear enough, I hate that I didn't take pics of this part of the project....

Now, getting back to those hips and the peg joint.  You need to fit the peg joint to the new hips.  I have used just superglue with the previous ones as I had nothing else on hand but I honestly would recomend a two part epoxy for added strength here.  Make sure that the joint doesn't sit too far into the cavity of the new hips as it won't fit right if you do.  What I usually do is close the torso up around the peg itself and press the hips up to it to see how it will fit and see if any parts are going to rub.  if the parts don't match up well use a sanding drum and the dremel to trim it up.

This is how it should look once finished:


All that is left now is assembling the legs, hips and torso together.  this is what my boba's legs looked like put together:

The knee joints have small pieces of cardboard glued to them to make a more fettesque set of knee pads.

Now, assuming you want to take all this a step further and make a removable helmet boba fett then you need to dig out that Gi-joe's torso with the neck still left on it and dremel that sucker off at the shoulders.  Dremel off boba's old neck right under the ball joint.  If need be dremel out the inside of boba's neck and fit in the new neck inside the old neck.  This will give it a good "turtleneck" look.  Glue that new neck in place and you've got a neckectomy finished too. 
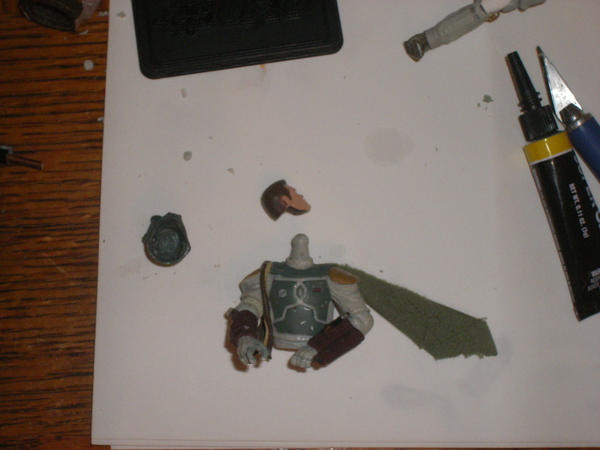
Here is what mine looked like afterwards:

I also took and dremeled out the original boba head to make the removable helmet.  I would suggest just buying a cast from clonehead though... SOOOO much easier! and def. worth the cost.


One last thing needs to be done to make the fig complete.  The belt needs to be cut to fit around the new hips.  With the old figure the belt fit inside the torso and around the peg.  This inner rubber of the belt needs to be shaved off with the exacto knife carefully making it more like a real belt.  Try to get it to fit over the new figure's hips carefull not to rip it.  If it is too tight heat it up in some boiling water and then stretch it slightly to get it to fit correctly. 

This should be your result:
Before the head/neck swap:


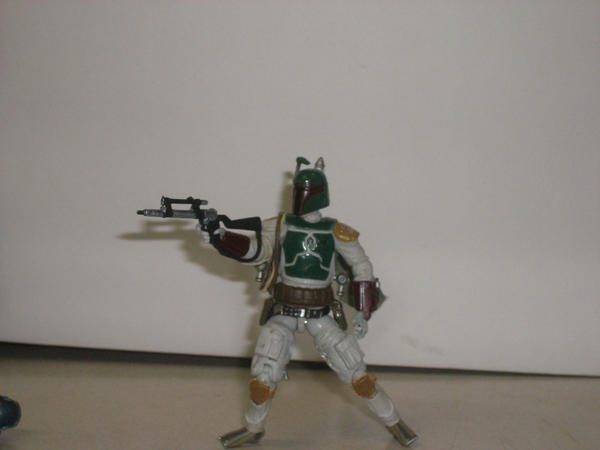
after neck swap, head swap, and paint:


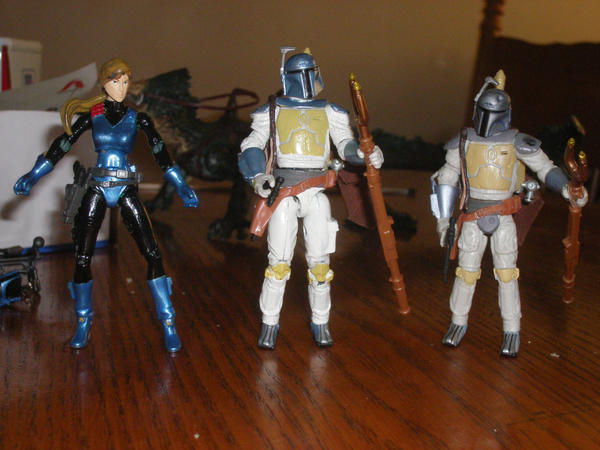
Posing with his younger version (an animated boba fett version of this process)


For the animated version I used different joe parts, I believe it was the legs and hips of a Flint figure

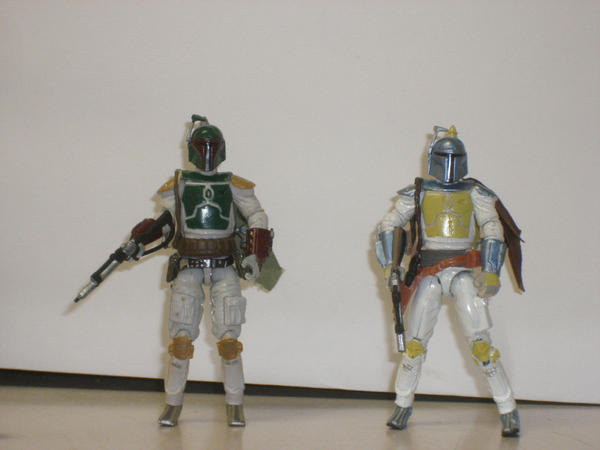
This same process was done on an animated boba fett.  This is a comparison pic of the difference between the SA joe version and the original stock boba fett sculpt:


As you can see the joe parts do make the figure grow a bit taller.  However, especially with the boba figure, I believe that it looks more proportionate than before.  When standing side by side the old figure looks stunted.

That's all I've got.  When I get the chance I will post a similar tutorial on what to do with star wars figs that already have ball jointed torso's and how to splice on joe lower halves.

Please tell me if this was helpful and explained thoroughly enough that you guys understand what i did.

Offline spudafett

  • Mando Master
  • Moff
  • *
  • Posts: 3570
  • Feedback: +7/-0
  • Gender: Male
  • He's no good to me mashed!
    • deviant art
Re: gi-joe hip replacement tutorial (strait torso)
« Reply #1 on: August 11, 2009, 08:50:27 PM »
other figures which have recieved this same treatment:

han solo:


lando:


greedo:

Offline Clonehead

  • Global Moderator
  • Grand Admiral
  • *
  • Posts: 13183
  • Feedback: +93/-0
  • Gender: Male
Re: gi-joe hip replacement tutorial (strait torso)
« Reply #2 on: August 11, 2009, 09:25:11 PM »
That was a very informative and awsome tutorial, Devon! Thanks for sharing that with us, dude!

Offline DocOutlands

  • headhunter extraordinaire
  • Moff
  • *
  • Posts: 4051
  • Feedback: +22/-0
  • Gender: Male
  • Rebel Finhead
    • Production Platform 3
Re: gi-joe hip replacement tutorial (strait torso)
« Reply #3 on: August 11, 2009, 09:50:25 PM »
Excellent!!  Now, if I could find a crappetonne of 25th Joes on ebay for 99 cents...  Basically, this should let me take otherwise desirable figures that were molded in the "goose-step style" (swivel shoulders and hips ONLY)  and give them some decent leg articulation?  I wonder... since you end up doing so much surgery on the SW fig's knee area... I'm wondering if a "goose-step" leg could be used if you were careful about how & where you made the cut, to use Joe thighs and SW calves.

Very interesting.  Now I have a MUCH better idea of how to look at Joes and SW figs for frankenmashing!

* DocOutlands wanders off, looking for Joes to sacrifice in the name of Knowledge and Learning...

Offline r1bb1t

  • Custom Fanatic
  • Captain
  • *
  • Posts: 732
  • Feedback: +0/-0
  • Gender: Male
Re: gi-joe hip replacement tutorial (strait torso)
« Reply #4 on: August 11, 2009, 09:50:58 PM »
Incredible tutorial. I know that it took a tremendous amount of time to comprise, and will be helpful to plenty of folks.
Awesome job all around, and thanks so much for sharing your knowledge.
Great tutorial.


MY HOTH DIO VIDEO WIP
feature=share

Offline spudafett

  • Mando Master
  • Moff
  • *
  • Posts: 3570
  • Feedback: +7/-0
  • Gender: Male
  • He's no good to me mashed!
    • deviant art
Re: gi-joe hip replacement tutorial (strait torso)
« Reply #5 on: August 11, 2009, 10:28:11 PM »
what do you mean by goose-step?  are you talking about a backwards knee?  I think it would work.  I know I did some drastic knee replacement on the mon calamari warrior, I used normal star wars circle and peg joint parts to do that....   Let me know when you get a chance to try this doc, I want to see how yours turn out!  ;)

Offline DocOutlands

  • headhunter extraordinaire
  • Moff
  • *
  • Posts: 4051
  • Feedback: +22/-0
  • Gender: Male
  • Rebel Finhead
    • Production Platform 3
Re: gi-joe hip replacement tutorial (strait torso)
« Reply #6 on: August 11, 2009, 10:43:08 PM »
Heh - you've never noticed how if you try and pose the old Kenner fig's in a walking stance, they look like they are goose-stepping?

You've got me thinking, boyo...  If one of those rubber-bands I use upstairs breaks, it could be catastrophic!   ;D

Thanks A LOT for the info in this!  I'm sure a certain swoop-gang's members will be some of the first beneficiaries of the technique.  Besides, if I screw up on one of *them,* I can disguise it as a "swoop accident"!!   O0

Offline spudafett

  • Mando Master
  • Moff
  • *
  • Posts: 3570
  • Feedback: +7/-0
  • Gender: Male
  • He's no good to me mashed!
    • deviant art
Re: gi-joe hip replacement tutorial (strait torso)
« Reply #7 on: August 12, 2009, 04:41:55 AM »
doc I can't wait to see it!  All of my swoop riders are either based completely on joe bodies or are spliced in a similar fashion.  It helps so much with getting the figures to sit right on the swoops.  That is something I've never understood about the star wars figs...  WHY go to all the trouble of having to make brand new sculpts that look like a retarted bowlegged cowboy when you make a new bike?  Make the all the figures with ball jointed hips and all you have to do is throw them in with the bike when you make it... no new sculpts needed!

Offline DocOutlands

  • headhunter extraordinaire
  • Moff
  • *
  • Posts: 4051
  • Feedback: +22/-0
  • Gender: Male
  • Rebel Finhead
    • Production Platform 3
Re: gi-joe hip replacement tutorial (strait torso)
« Reply #8 on: August 12, 2009, 07:40:54 AM »
I'm beginning to think Hasbro's GI Joe and SW dept's have been told "don't you DARE filch design ideals from the Other Side!"  Which is really...odd, given the Joker Squad rocket launcher is actually an old Joe weapon!!  Weird.

Offline Tamer

  • Administrator
  • Grand Admiral
  • *
  • Posts: 37683
  • Feedback: +204/-0
  • Gender: Male
  • He who is one with the Walker
Re: gi-joe hip replacement tutorial (strait torso)
« Reply #9 on: August 12, 2009, 06:48:44 PM »
Spudafett, thank you for sharing your techniques. I have never met a finer group of Star Wars customizers. Just when I think I can't be amazed anymore by what you guys do, you post something like this giving up your artistic techniques for the sake of other customizers. This was just an awesome tutorial and I was even able to follow it becuase of your great pics that went along with your steps. You sure can write assembly diagrams for me anytime. This will go up on the front page tomorrow. I hate to blow the Shipyards horn, but I do not know of any other place that has the depth of posted knowledge and tutorials on how to do this from scratch the way you folks have assembled it.  I might just have to sacrifice an atat driver or two to see if I can pull of the superarty and helmetless thing. Any chance you have done arms before too? LOL. I bet I know the answer to that one.

Offline spudafett

  • Mando Master
  • Moff
  • *
  • Posts: 3570
  • Feedback: +7/-0
  • Gender: Male
  • He's no good to me mashed!
    • deviant art
Re: gi-joe hip replacement tutorial (strait torso)
« Reply #10 on: August 12, 2009, 08:21:03 PM »
swapping gi-joe arms with star wars figures?  actually I have... from the elbow down.  this is what it was: still an unpainted figure so I hope you can tell what I had done:


basically the gi-joe 25th figures have the same arm sculpting styles that most of the newer star wars figures have.  The elbows are circle/peg "ball" joints and the shoulders are circle/post ball joints...   We need a standardized way of talking about all these articulation points and styles... I think i'm going to start a new sticky thread if that's ok with you guys with reference pics and a standardized term for each figure part element.  I'll need to get my photoeditor back working so that I can make some diagrams to make understanding these kinds of things easier for those of us who havn't chopped up hundreds of figures with varying styles of sculpts....

anyways, back to the swapping. 

Most star wars figures NOW come with a two part molded chest/torso.  The shoulder joints that go into these are a "t" shaped post with a circular swivel joint in the arm.  Gi-joe figures have this same design.  Now each figure is slightly different so some dremeling or chisseling might have to be done inside the chest cavity to get the figures arms to fit right.

for instance, this figure used mostly joe parts but the arms are that of a legacy clone figure.  The arm's t-posts had a longer peg on it and stick out slightly so that at a certain angle you can see up into the joint through his pits.  However from the front it looks fine!  It did take some triming of the end of the pegs to get it to swivel smoothly however and is still very tight.


Man... I need to do a few more of these articulated customs and get better wip pics... I could have explained things alot better.  I'm horrible about getting lost in working on a fig and forgetting to take progress pictures!

Offline DocOutlands

  • headhunter extraordinaire
  • Moff
  • *
  • Posts: 4051
  • Feedback: +22/-0
  • Gender: Male
  • Rebel Finhead
    • Production Platform 3
Re: gi-joe hip replacement tutorial (strait torso)
« Reply #11 on: August 12, 2009, 09:40:52 PM »
Holy sweetness, spud!!  Keep at it!  Every pic you post, I'm learning.  Yeah, and itching to rip a few out, too.

I love that Cody-esque Mando.  You need to finish him up.

Offline Tamer

  • Administrator
  • Grand Admiral
  • *
  • Posts: 37683
  • Feedback: +204/-0
  • Gender: Male
  • He who is one with the Walker
Re: gi-joe hip replacement tutorial (strait torso)
« Reply #12 on: August 13, 2009, 06:55:36 AM »
Yepper that Cody looking Fett looks sweet. Thanks for showing the arm trick!

Offline spudafett

  • Mando Master
  • Moff
  • *
  • Posts: 3570
  • Feedback: +7/-0
  • Gender: Male
  • He's no good to me mashed!
    • deviant art
Re: gi-joe hip replacement tutorial (strait torso)
« Reply #13 on: August 13, 2009, 07:41:45 AM »
yeah that mando was supposed to be a "scout/communications" specialist and was going to be done in forrest camo, but I havn't brought myself to paint it yet...

I will keep working on these tutorials,  I've got some techniques for the new animated clones I know you guys will want to see.

I also have an idea for making removable armor from an animated clone.....

Offline XizorsVirago

  • Lieutenant
  • *
  • Posts: 187
  • Feedback: +0/-0
  • Gender: Male
Re: gi-joe hip replacement tutorial (strait torso)
« Reply #14 on: August 13, 2009, 05:40:03 PM »
I'm beginning to think Hasbro's GI Joe and SW dept's have been told "don't you DARE filch design ideals from the Other Side!"  Which is really...odd, given the Joker Squad rocket launcher is actually an old Joe weapon!!  Weird.

The Hunt for Grievous battle pack has a pretty sweet chain gun that was originally used in a Roadblock GI Joe figure, too. I wonder what else they've borrowed? :D