Author Topic: Rogue82's Custom Figures  (Read 7379 times)

Offline botwt

  • Brigadier
  • *
  • Posts: 1114
  • Feedback: +0/-0
  • Gender: Male
    • Botwt's Star Wars Figure Collection
Re: Rogue82's Custom Figures
« Reply #15 on: June 24, 2012, 05:27:16 PM »
Great looking pieces!!

Offline Sjefke

  • Commodore
  • *
  • Posts: 915
  • Feedback: +0/-0
  • Gender: Male
  • The Yuzzum is in
Re: Rogue82's Custom Figures
« Reply #16 on: June 25, 2012, 05:32:51 PM »
I can learn so much from reading these.  Thanks

Offline Luke Sprywalker

  • Global Moderator
  • Grand Admiral
  • *
  • Posts: 6749
  • Feedback: +30/-0
  • Gender: Male
Re: Rogue82's Custom Figures
« Reply #17 on: June 25, 2012, 06:52:13 PM »
Great project! Reminds me of Stitch Fett's microman work. Love your choices and man a led in the backpack!?! Now that is iinsane! Can't wait to see more!

Offline Rogue82

  • Ensign
  • *
  • Posts: 52
  • Feedback: +0/-0
  • Gender: Male
Re: Rogue82's Custom Figures
« Reply #18 on: June 26, 2012, 02:51:08 PM »
Thankyou for the Front Page, Beaming from ear to ear! (even told my wife about it!) I'm on holiday for a week so nooowhere near my bench to get anything done on this figure. I'm actually in Wales, so nowhere near anything really. I'd love to be involved in a podcast (I do listen to each episode) but my knowledge is limited. Much of what i've learned is from Spooky's hoth thread and research, and once I'm back at my PC I'll find that LED website for you. I do plan on lighting a POTF2 A-Wing and a vintage Y-Wing with fibre optics - console, thrusters etc - but its not my focus at the moment. That said I'm happy to answer any questions thrown at me to the best of my knowledge.

Thank you to everyone for your very kind words. I hope to give you another uupdate soon.

Offline Rogue82

  • Ensign
  • *
  • Posts: 52
  • Feedback: +0/-0
  • Gender: Male
Re: Rogue82's Custom Figures - LED basic tutorial
« Reply #19 on: June 29, 2012, 03:51:53 PM »
FAO Tamer.

As promised here is the website for working out LED's.
LED's for beginners is well worth reading before you try anything yourselff (it'll save you money on components)
LED Center has some good information on how they work and for working out which components you need use THIS PAGE

Which looks like this:


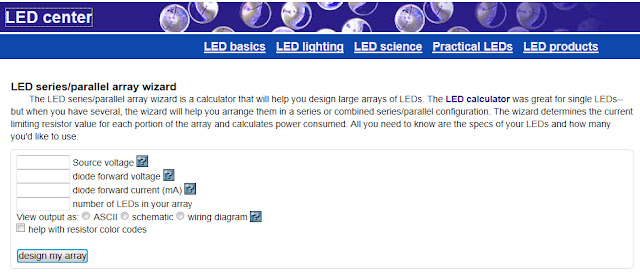
For the majority of dio's people will use 9V batteries but others will work fine (I've used much smaller for scorch but I'll stick with 9V for this tutorial). so type 9 into the top box. I used this Superbright LED for my backpack. To work out the forward voltage click on specification and scroll down to forward voltage, in this case for the Blue LED its 2.4V, so type that in. For the Forward current type in 20mA (as suggested by the help guide) and finaly 1 for the number of LED's. Click wiring diagram and design my array. This will produce this outcome:


The wizzard will show you the various displays but wiring diagram is the easiest to understand. It also tells you what size resistor you need, in this case a 330 ohm resistor is needed.
Incedentally if you are just using 1 LED there is no need to use a 9V battery as most of its power will be wasted by the resistor as heat, but try adding more LED's to the wizzard and you'll see changes to the diagram and the resistor size. eg: 6 LED's needs 2 100 ohm resistors.

And finally for those who aren't aware Spookymufu's Hoth Dio over at Rebelscum is well worth a look at for info and ideas on lighting and how to connect it to a mains supply.
« Last Edit: June 29, 2012, 03:59:00 PM by Rogue82 »

Offline Tamer

  • Administrator
  • Grand Admiral
  • *
  • Posts: 37693
  • Feedback: +204/-0
  • Gender: Male
  • He who is one with the Walker
Re: Rogue82's Custom Figures
« Reply #20 on: July 01, 2012, 08:37:13 AM »
Sweet, as many resources as we can get.

Offline Luke Sprywalker

  • Global Moderator
  • Grand Admiral
  • *
  • Posts: 6749
  • Feedback: +30/-0
  • Gender: Male
Re: Rogue82's Custom Figures
« Reply #21 on: July 01, 2012, 08:44:41 AM »
Awesome! Thanks for the info. I am very interested in adding led's to many of my projects.

Offline Rogue82

  • Ensign
  • *
  • Posts: 52
  • Feedback: +0/-0
  • Gender: Male
Fixing the BS Biker Scout.
« Reply #22 on: November 12, 2013, 06:54:43 AM »
Back again briefly after a while out with a fix for the Black series and DTF Biker Scout and his incorrect shoulder rings. This has probably been covered elsewhere but here's my method.
Started with a Black Series Biker scout and an old Saga Scout that I picked up in a spares bundle.


First I cracked the body of both figures using the sock and vice trick. I don't have a vice to hand so I used a work bench grip to apply the pressure and crack that bad boy open.


The split figure's.


I then reassembled the Black Series figure with the Saga Figure's shoulder to forearm and attached the gloves. and glued it together. There is a small area on the neck where the white can be seen but I'll add a dab of paint to cover that.


Finished figure and some shots on an old POTF2 bike. I may yet go back and fix the joint in the ankle aswell with a simple boil and pop but otherwise all done.


Forget Wookies, Biker Scouts pull their OWN arms out of their sockets... then beat you with them!