Author Topic: My Star Wars  (Read 12980 times)

Offline jkno

  • Dracula's Neighbor
  • Admiral
  • *
  • Posts: 2297
  • Feedback: +42/-0
  • Gender: Male
  • Dracula's Neighbor
    • Deviant
Re: My Star Wars
« Reply #15 on: March 09, 2019, 05:42:30 AM »
The SSC figure looks much better indeed. Good job
Collecting has the permanence of herpes, it mutates, but doesn't go away
My collection
Trade Feedback

Offline rastanz

  • Darth Wannawanga
  • Cadet
  • *
  • Posts: 31
  • Feedback: +0/-0
  • Gender: Male
  • All Hail the Empire!
Re: My Star Wars
« Reply #16 on: March 11, 2019, 05:23:32 AM »
The SSC figure looks much better indeed. Good job

Thank you for your comment, much appreciate your input.

..........................................................

Been messing around with yet another of my SSC 1/6 figures this time Padme and SSC Han Solo Bespin version.

Padme was first up.


Stripped her down of clothing to access the arms and head... the body is in good shape with no loose joints.

Changing the head sculpt was a mish because the neck plug didn't want to co-operate so I had to attack it with my heat gun.

Once the original head was off I proceeded to measure the neck length which seemed a bit too long so I used a shortened open end female plug just so the new head sculpt could slot further down over the ball end of the neck connector.

I opted not to use the balaclava with the new sculpt so I just left it loose around her neck which is also hiding the neck joint.


The next mod was to somehow shorten them chimpanzee arms of hers.

You can see they're way too long but that is the furtherest the gloves can go, I just couldn't push them any higher up on her arms


Upon removing them I found that there was a long connector inside each of her gloves that plugged into the arm sockets, using my modellers saw I removed about a quarter inch off of each arm then trimmed off about half of that from the connectors inside her gloves.

I had to be exact with my measurements so that I didn't remove too much of the arm or else I would have completely cut away the socket that the gloves plug into.


The arms look a lot better and not so chimpanzee any more, nothing else really needed modifying but I also want to scratch build her a better gun holster and belt, the one that she has is too big even for her laser pistol... I might even trim down them pom poms.

Happy with the mods especially addressing those arms.


Offline Tamer

  • Administrator
  • Grand Admiral
  • *
  • Posts: 37694
  • Feedback: +204/-0
  • Gender: Male
  • He who is one with the Walker
Re: My Star Wars
« Reply #17 on: March 12, 2019, 02:16:45 AM »
Yep, definitely way better. Hats off to you.

Off to share.

Offline Darth More

  • ...'cause we always want more...
  • Grand Moff
  • *
  • Posts: 4621
  • Feedback: +0/-0
  • Gender: Male
  • Darth More's Custom Workshop
Re: My Star Wars
« Reply #18 on: March 13, 2019, 05:11:26 AM »
This is a costume I had almost forgotten about. Your 1/6 scale Padmé looks beautiful! You achieved a vast improvement compared to the official release. Good job!
I'm still stunned by your collection!

- Philipp

Offline rastanz

  • Darth Wannawanga
  • Cadet
  • *
  • Posts: 31
  • Feedback: +0/-0
  • Gender: Male
  • All Hail the Empire!
Re: My Star Wars
« Reply #19 on: March 17, 2019, 08:53:55 PM »
Yep, definitely way better. Hats off to you.

Padme definitely looks more in proportion.

This is a costume I had almost forgotten about. Your 1/6 scale Padmé looks beautiful! You achieved a vast improvement compared to the official release. Good job!
I'm still stunned by your collection!

- Philipp

Thanks Philipp, I quite like the look of this Padme outfit too.

.........................................................................

Well, I did have a photo build log of my 1/6 SSC Bespin (with mynock) and Hasbro Hoth Han (with Taun taun version) Solo mods but thanks to a firmware update on my phone's OS, the folder with the pics got swallowed by the internet data monster so I only took a few shots of where they both stand at the moment.

The SSC body is surprisingly quite good, no loose joints or connectors.

Below is a photo of SSC Han still in box including accessories.


On the other hand, the Hasbro body is a complete mess, loose at almost every joint.

The SSC head sculpt was the usual tug-of-war to pop off but no biggie... his clothing and accessories are all in great condition although my only complaint with all SSC figures is that the footwear is always so stiff making the ankles almost unposeable, I wish SSC would use a softer material when making their boots.

The Hasbro head popped off very quickly and easily, the clothing is very good for a cheap toy but the accessories including the holster and blaster are made of a tough plastic and very toy like.


Got two head sculpts, one serious Sam, and one smiley Solo, I think I like the smiley version on my Bespin Han and the serious head on the Hasbro Hoth Han, also, the Hoth helmet and goggles are slightly a little on the large side for the new head sculpt.


Now, the Taun taun... Nice detail, good scale size but since it is hollow and made from a soft plastic all he wants to do is buckle up and lay down, so I'll have to conjure up some kind of mounting to peg his feet onto just to keep him upright.

Anyway here's some Han photo's, Hoth Han and Taunsy is still WIP (photo's to come).

Thanks for looking.
« Last Edit: March 17, 2019, 08:56:34 PM by rastanz »

Offline Tamer

  • Administrator
  • Grand Admiral
  • *
  • Posts: 37694
  • Feedback: +204/-0
  • Gender: Male
  • He who is one with the Walker
Re: My Star Wars
« Reply #20 on: March 18, 2019, 02:46:20 AM »
Oh yeah, much great improvements on that Bespin Han. Looking forward to seeing that Hoth Han in more detail too.

Off to share.

Offline rastanz

  • Darth Wannawanga
  • Cadet
  • *
  • Posts: 31
  • Feedback: +0/-0
  • Gender: Male
  • All Hail the Empire!
Re: My Star Wars
« Reply #21 on: June 13, 2019, 12:41:12 AM »
Hi guys n gals, it's been a while since my last post but I've been building now and then... my first update is my custom Anakins.

Bought a couple of unpainted 1/6 Anakin heads from eBay, started customizing them around the same time I was building my 1/144 Bandai Falcon (which I will post soon), didn't take much photo's of the head painting process but here's a few shots from painting the eyes for Anakin Sith.

This is my approach to the eyes...

Stage 1: First colour black/grey (x2 thin coats) for the base of the iris.
Let dry 30 - 45min.

Stage 2: Second layer colour 'fire red' (x2 thin coats) leaving a thin black outline of the edge of the iris.
Let dry 30 - 45min.

Stage 3: Third layer colour 'flat yellow' (x2 thin coats)
Let dry 30 - 45min.

Stage 4: dry-brushing (dabbing) red in the corners of the eyes and in the iris to achieve blood vessels and just to blend the red with the yellows and give the eyes some depth.
Let dry 20mins then clear gloss to lock in and seal the layers, let dry a further 20mins.

Stage 5: black/grey around the top edge of the eye lids to simulate shadows then add in the pupil which took me at least three attempts, one attempt he was cross-eyed another he looked like he had big puppy eyes LOL, hence the clear gloss coat so I could wipe away any mistakes and start over if needed.
Let dry 30 - 45min.

Final stage: seal the work with a clear gloss and let dry.
I enjoy painting head sculpts and I love the challenge of painting the eye's, my photo's always seem to mask the tiny details but he looks better in person.
I'm happy how this head turned out.

Cheers.


Offline rastanz

  • Darth Wannawanga
  • Cadet
  • *
  • Posts: 31
  • Feedback: +0/-0
  • Gender: Male
  • All Hail the Empire!
Re: My Star Wars
« Reply #22 on: June 13, 2019, 01:10:01 AM »
Recently completed my Bandai Falcon, I applied various painting and weathering techniques learned from reading other's build logs and watching hours of YouTube video's.


Parts used:

Base kit, Bandai 1/144 Millennium Falcon TFA model kit
308 Bits Shapeways parts:

Turret Well Windows set
Engine Exhaust Vents set
Cabin Cone (5 footer)
Laser Yoke and Laser Cannon set
Docking Rings set (5 footer)
(Optional) Radar Mount Base and Round Radar set (5 footer)
Electrics:

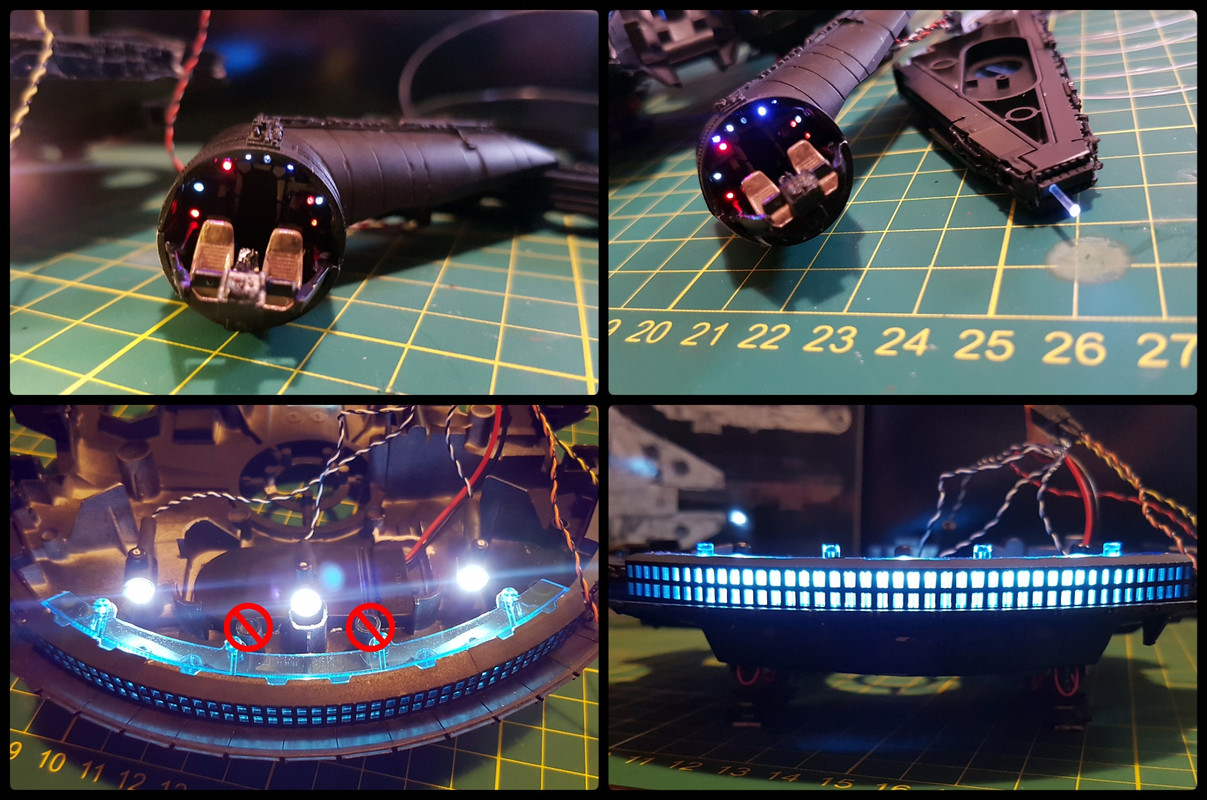
Tirydium Models TFA Millennium Falcon Lighting Kit SW-09
Kitbashed addons:

Electric Guitar D string for Landing Gear hoses
Extra fiber for Headlights and Caution lights
Parts excluded from the base kit:

Boarding Ramp D2-24,D2-25 and D2-26 parts
Turret Well Windows A15 and Cabin A14 clear parts
Engine Exhaust Vents F3 and F4 parts
Cockpit Cabin E1-24 and E1-2 parts
Landing Gear Covers A12, A13, A17, A19, A20 parts
Laser Canons F6 and F13 parts
Docking Rings F2, F5, E1-4 and E2-44 parts
Decals used:

Only applied the logo decals from the Bandai sheet and the red decal that goes on the front of the Cockpit Tube.

Everything including the panels and markings were painted with Archive-X enamels, weathered with mig oils Starship Filth, and Black (lightened), no panel or pin washes.

Warning this is the complete build so there will be many photo's following...

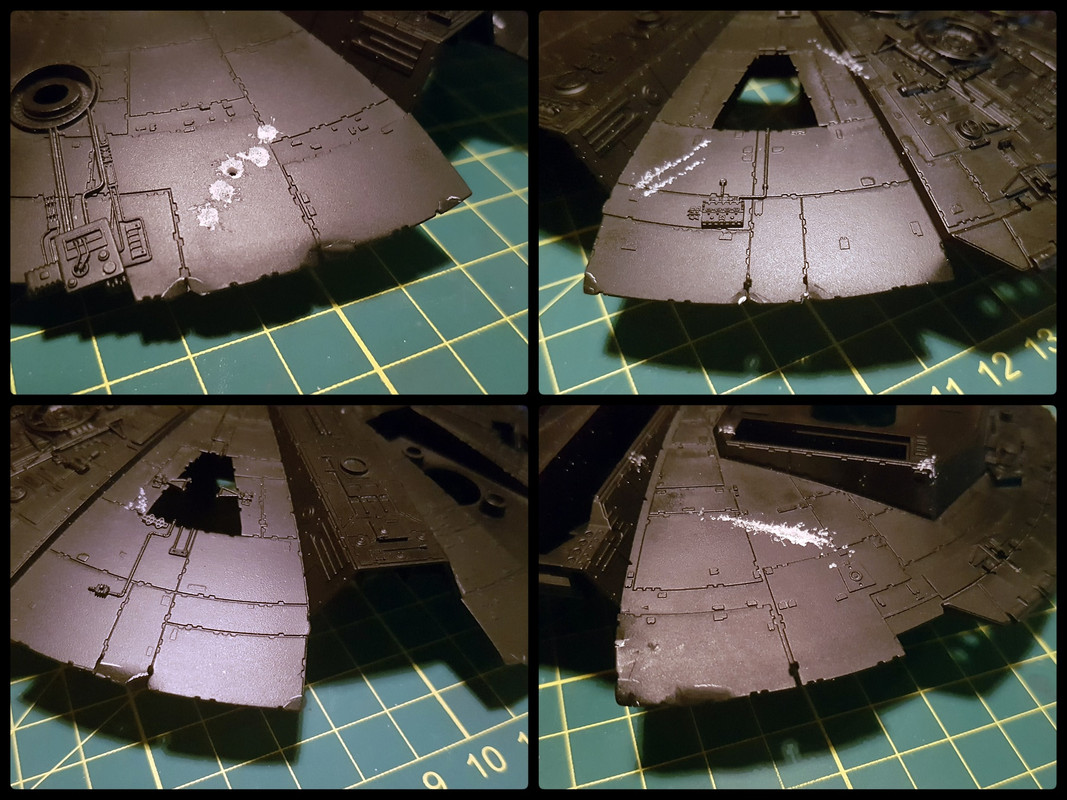
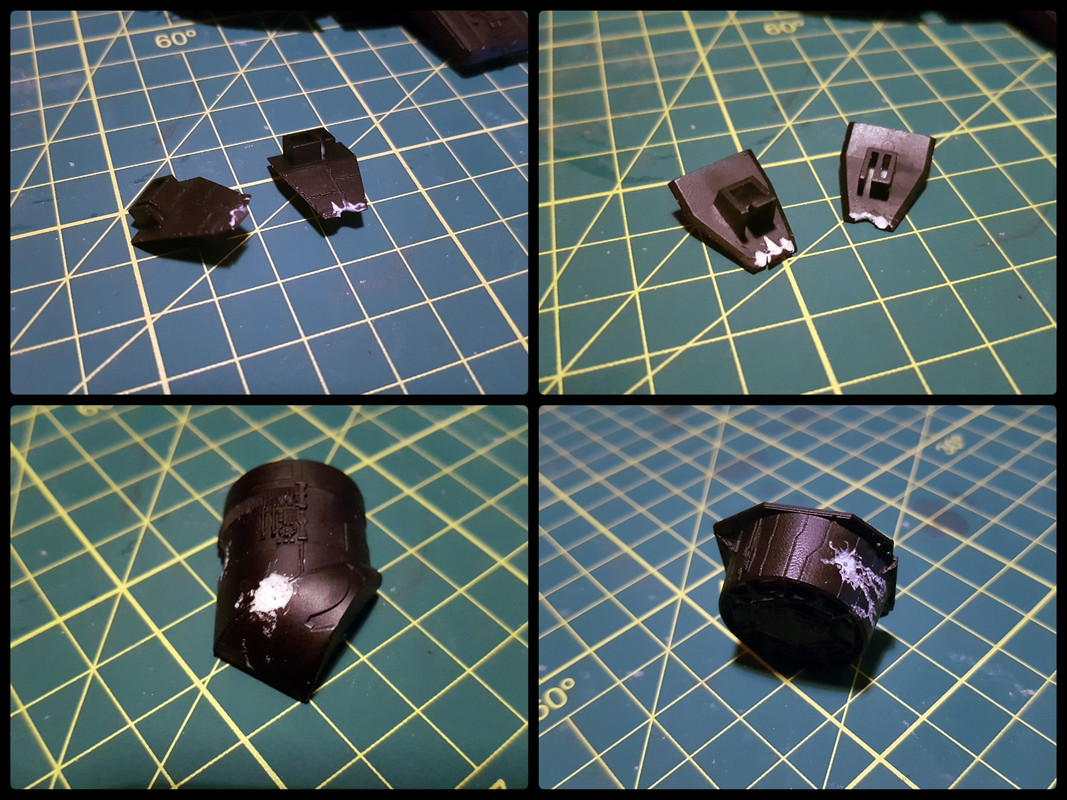
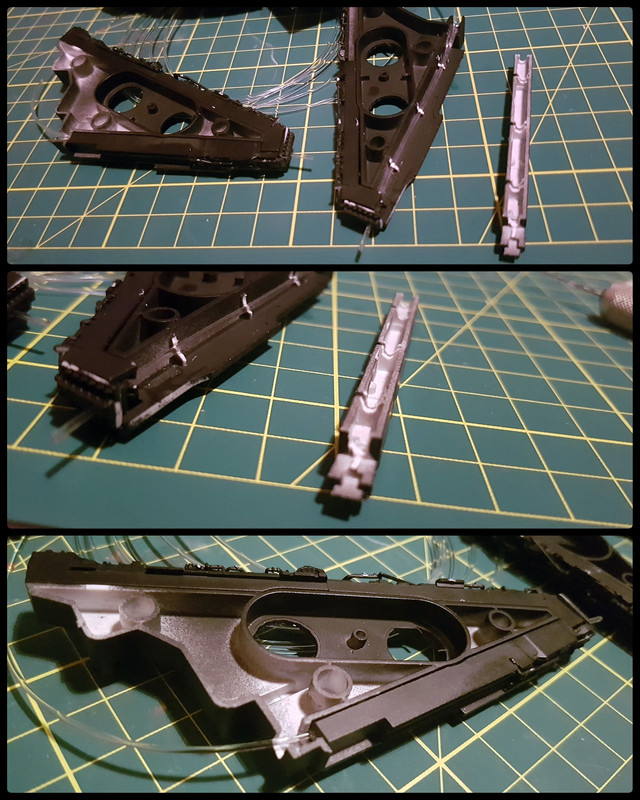
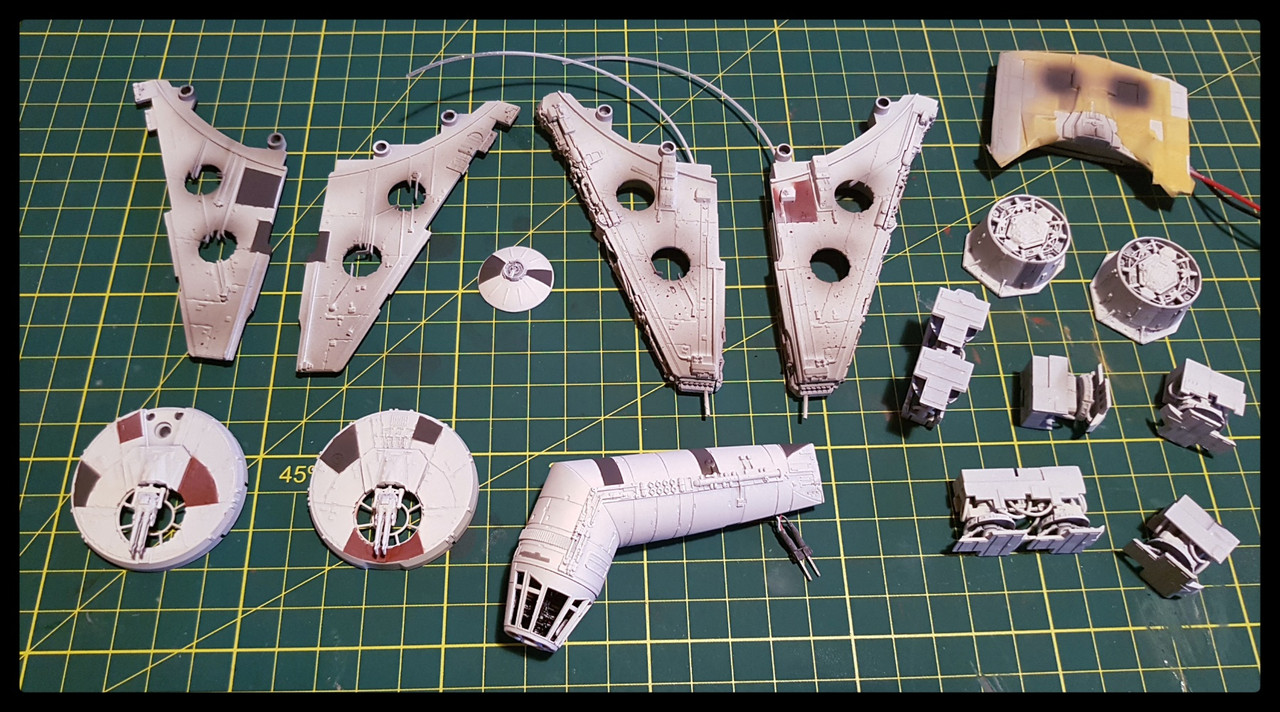
I primed everything with a flat black acrylic before hand and proceeded to add the damage using a dremel and a heat gun to bend some areas of the panelling.


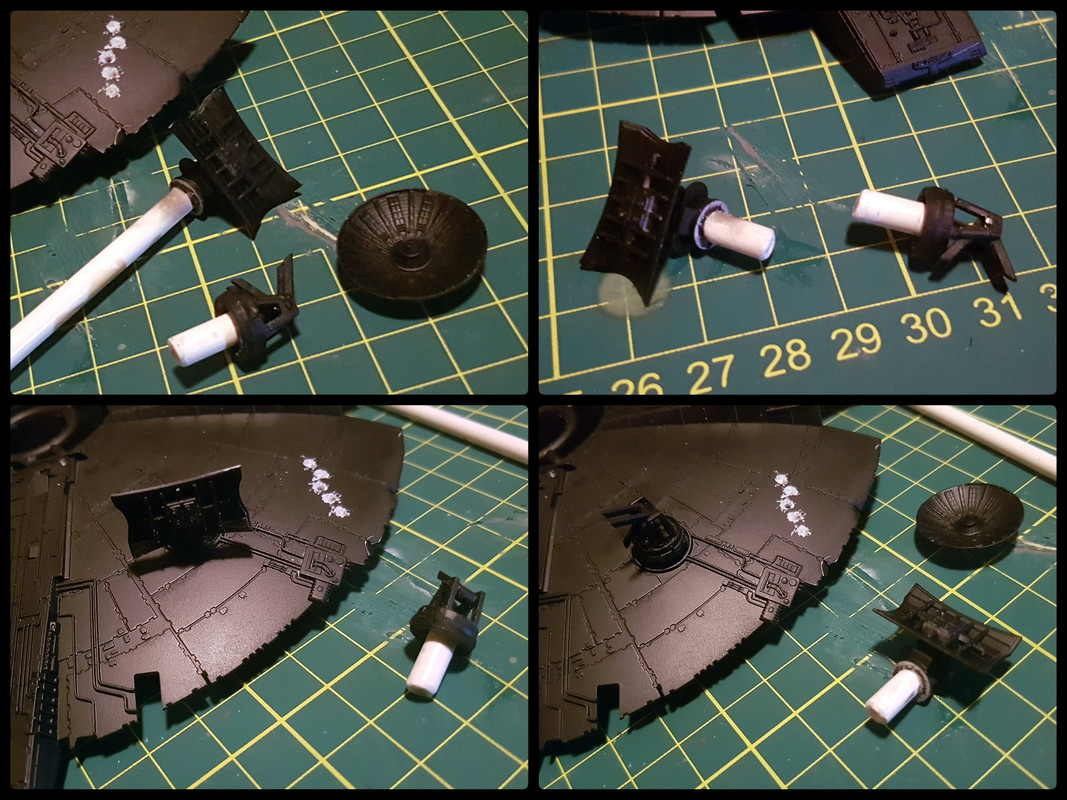
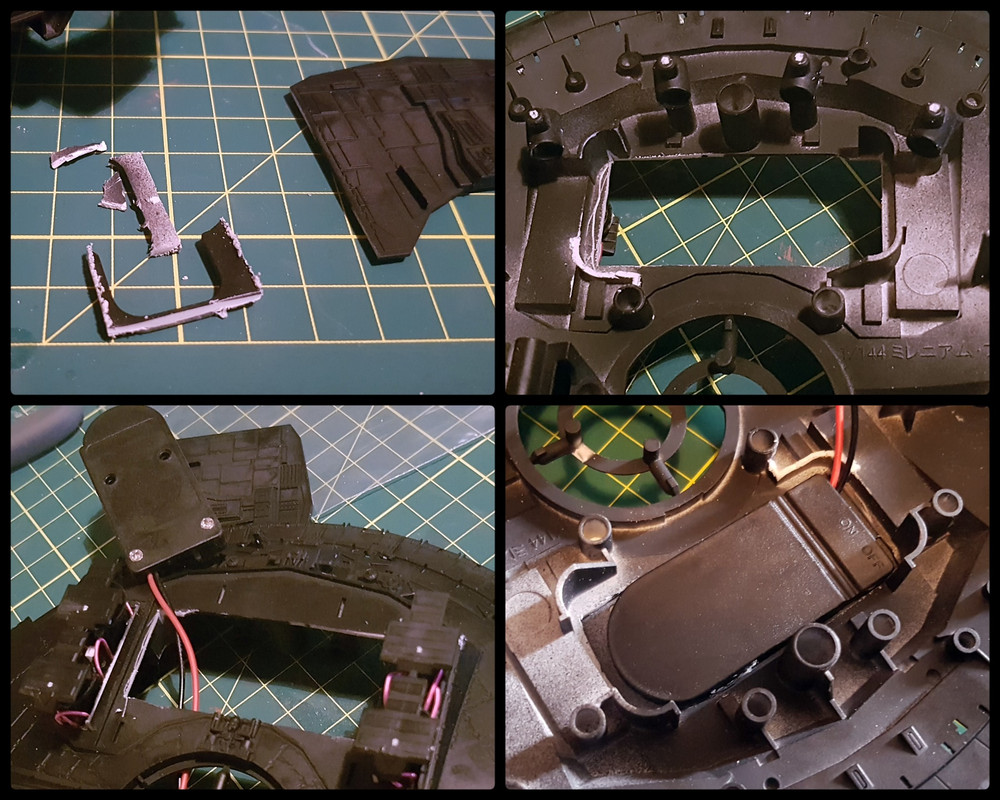
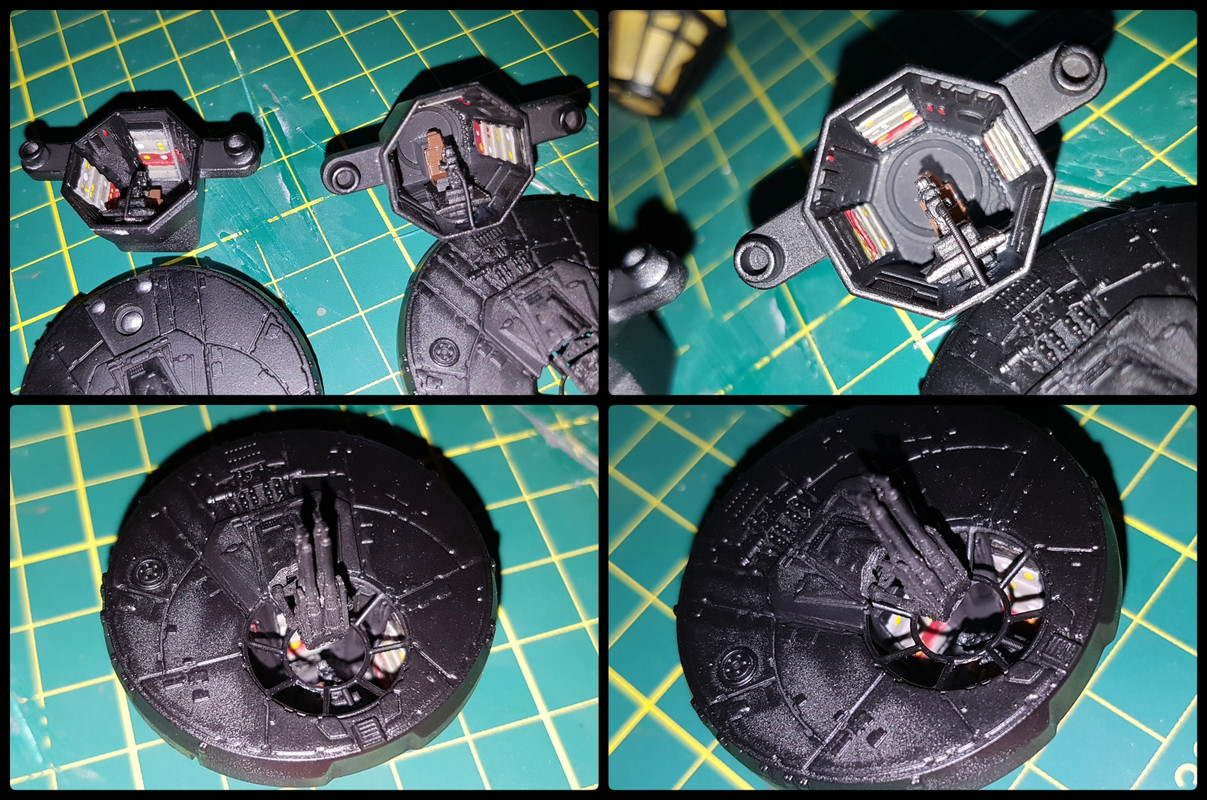
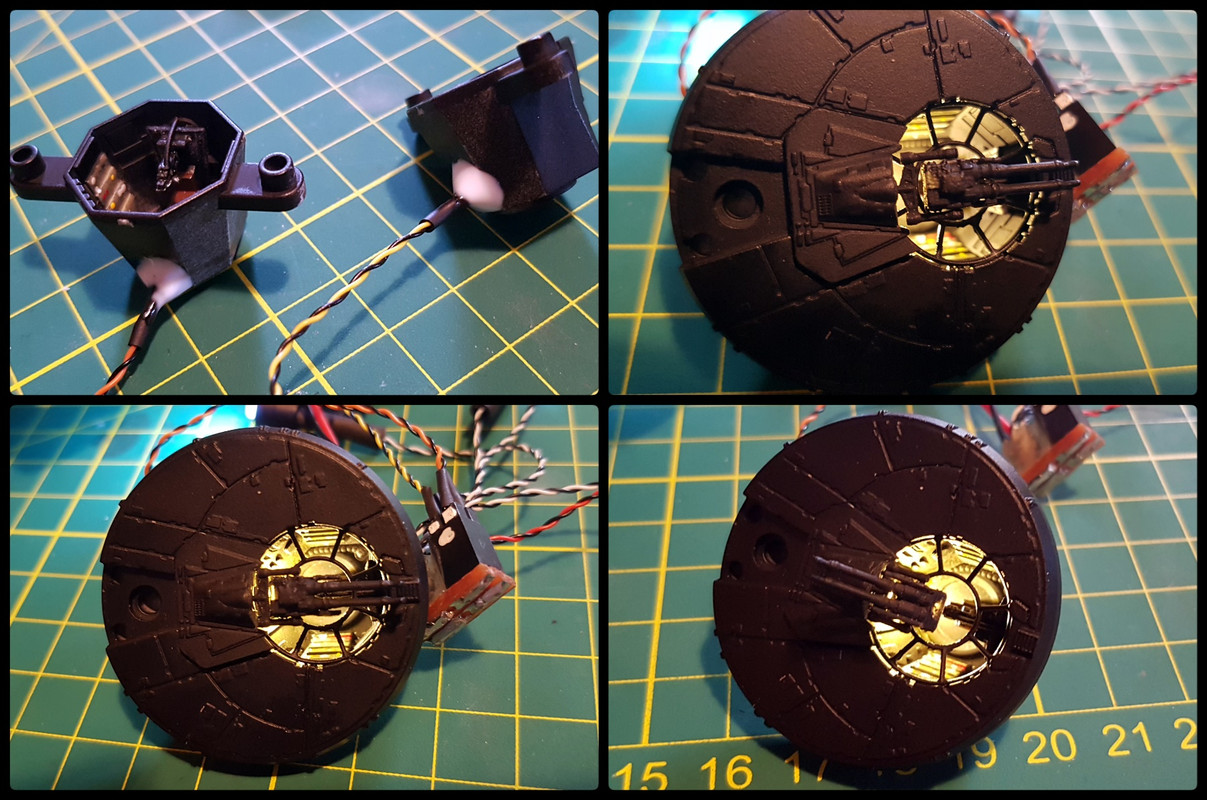
I removed the original mounts for the dish replacing them with styrene tube so I could have the option to swap them out on display.


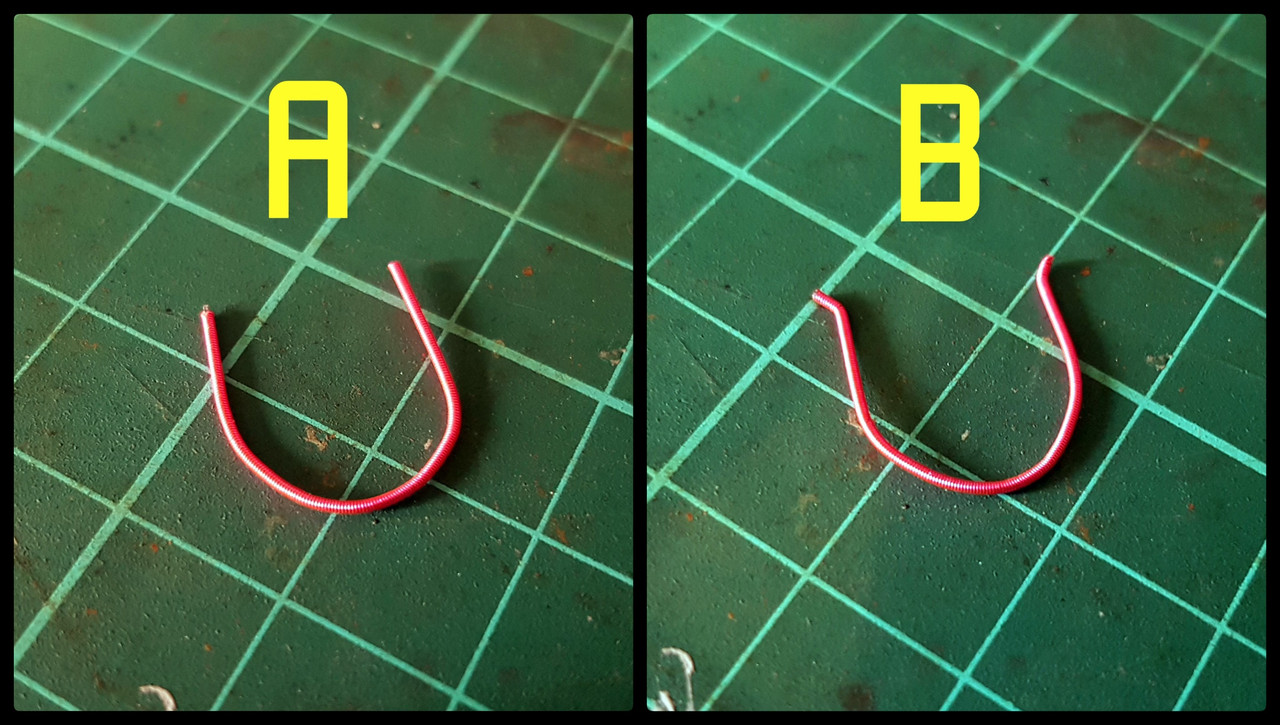
I used a spare guitar string to kitbash some of the hydraulic hoses on the landing gear, I bent the ends of the string to help anchor them into the holes then glued them in place.


Used my hobby knife to cut away a channel in the tabs to route the fiber strand for my mandible headlights.


I widened the opening for the battery compartment so I could mount the battery holder to the cargo lift cover.


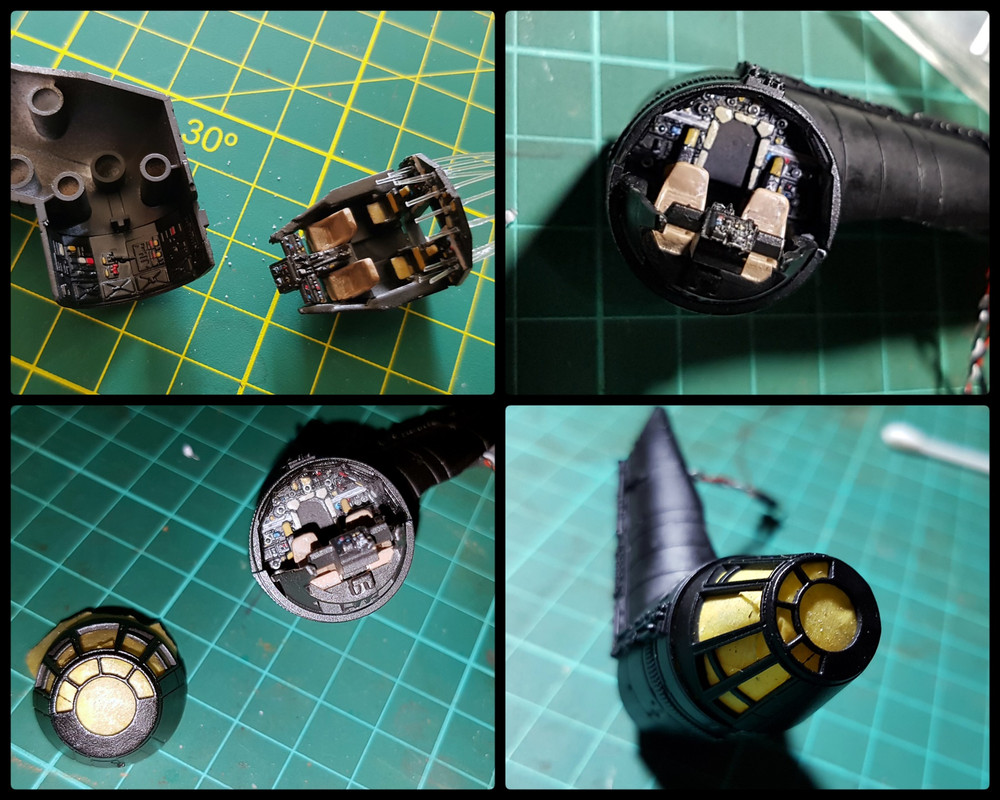
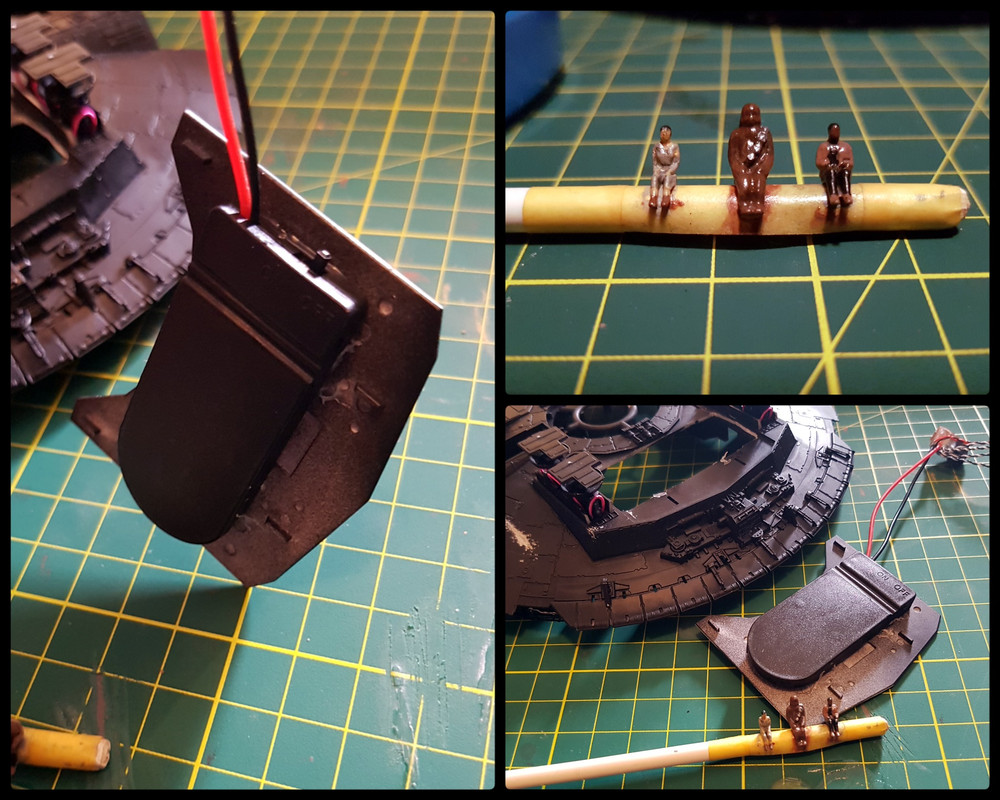
Started painting the tiny details in the cockpit as well as the figures then masked off the nose cone ready for a base coat.


Installed the fibers in the back-wall and mushroomed the ends to prevent them from popping out, I then tacky glued them into place.


My plan for the battery holder worked just fine after applying some tacky glue which I also applied around the wire connections themselves for added strength.


Lighting test... I used only three of the four engine leds , the fourth will light the Mandible headlights and the red caution lights, I also opted not to use the original mounting and instead trimmed away the middle support pillar to use as the mount for the middle engine led.


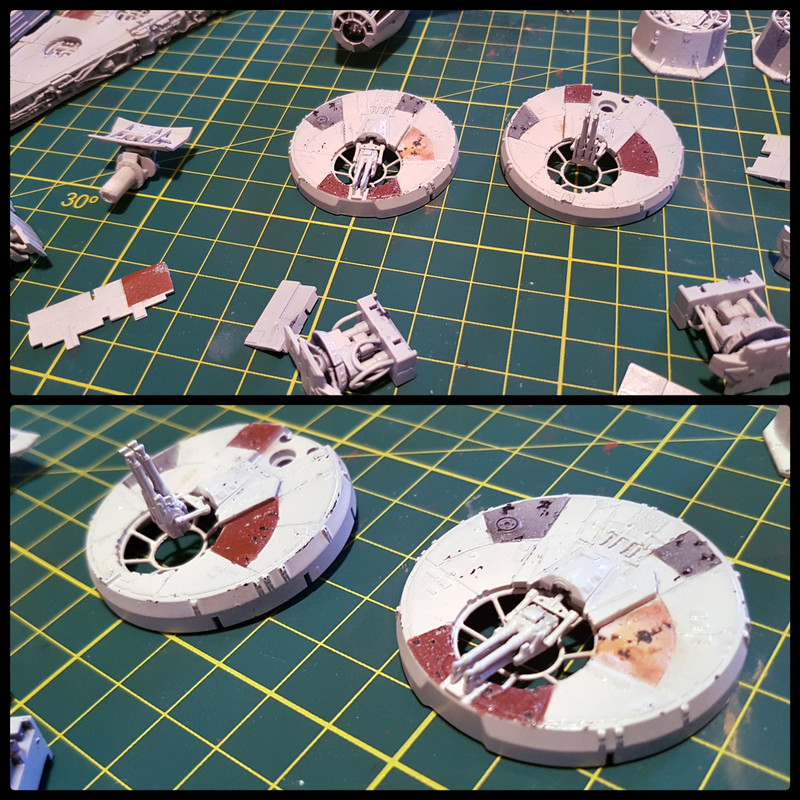
Painted the details in the Gun-wells, drilled the mounting holes for the nano lights which are held in place with more tacky glue... after taking a look at my reference photo's I noticed the kit Gun-well controls didn't have the hose on the front console's so I kitbashed some using more guitar string.


Another lighting test before moving on to the next step.


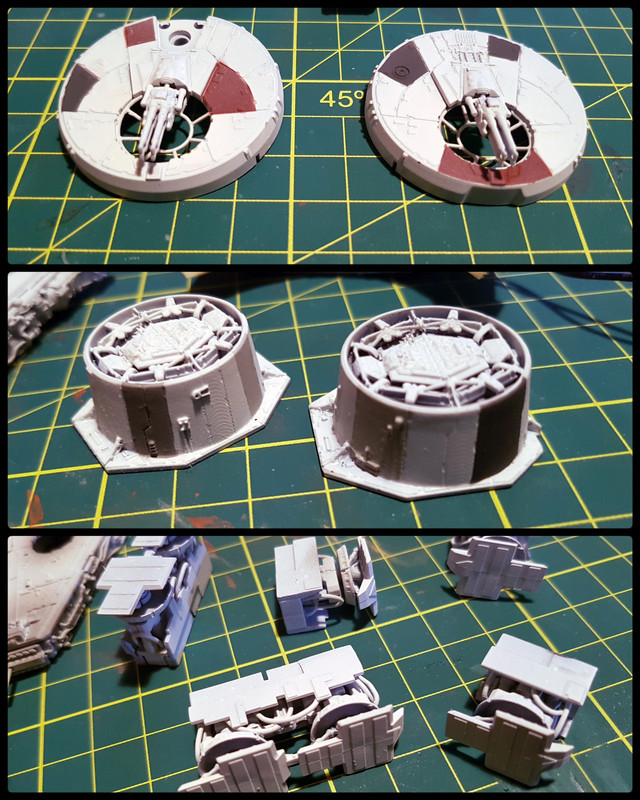
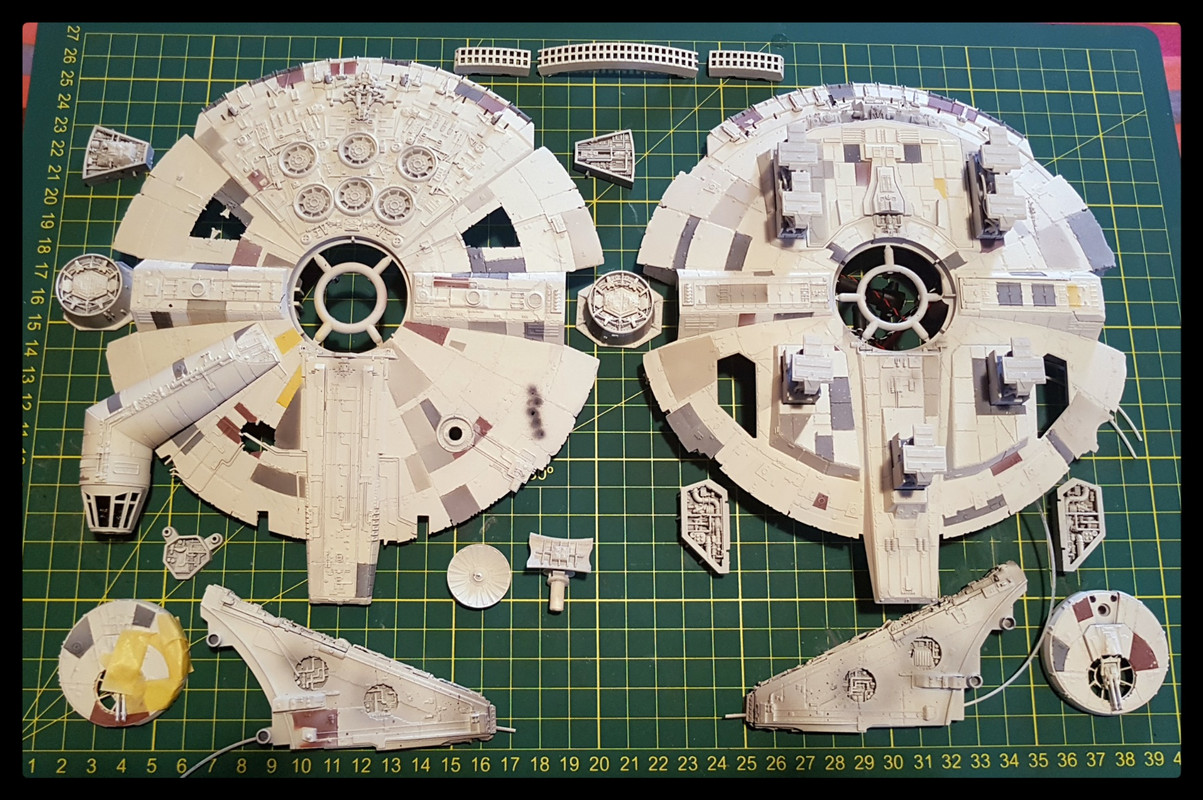
I airbrushed a light layer of Archive-X reefer white base coat and continued to masked off the panels that needed to be painted.


More painting...

Preshaded the Mandibles and other areas.


I knocked back the panel colours with a mist of base coat then applied a clear gloss over everything ready for weathering stages...


Added damage and more predominant weathering to certain areas of the kit...


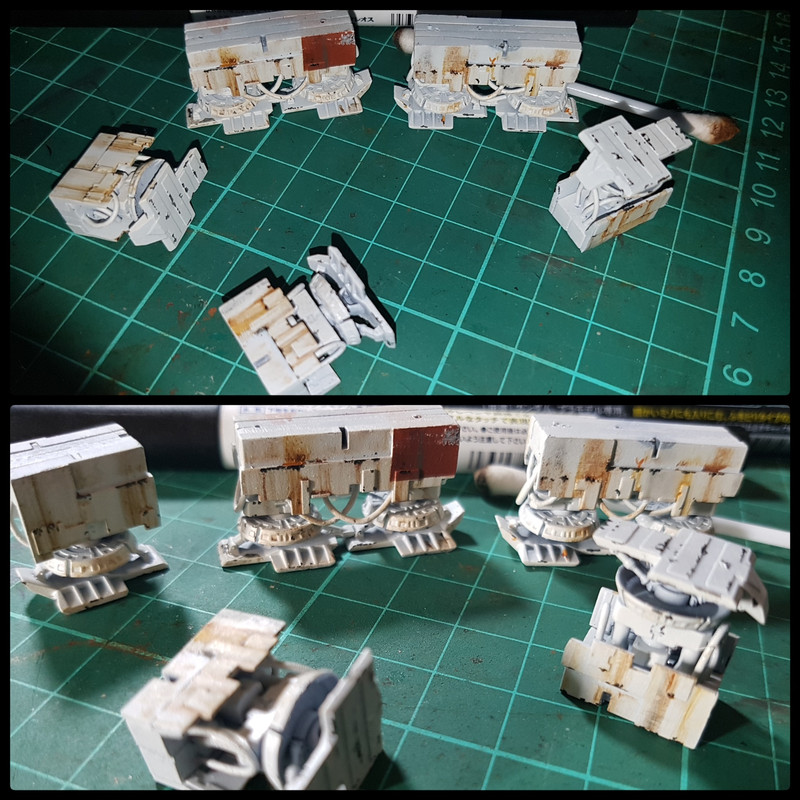
Started detailing the landing gear with rust and mig oils and also used a black Gundam marker to emulate chipping around the edges of the doors and under the feet...


More follows in next post...

Offline rastanz

  • Darth Wannawanga
  • Cadet
  • *
  • Posts: 31
  • Feedback: +0/-0
  • Gender: Male
  • All Hail the Empire!
Re: My Star Wars
« Reply #23 on: June 13, 2019, 01:23:51 AM »
Build log continued...

Applied the tiny decals everywhere then sealed them with a light coat of clear gloss...


Streaking with mig oils begins...


I dabbed a couple of spots of mig Starship Filth and black on the nose of the mandibles then blended with a soft brush.


Stage 1 of streaking completed on the top and bottom hulls...


Worked out the wire routing for my kit, I used some cable sleeving and heatshrink to bundle the fibers together... I also used tacky glue to mount the main lighting board to the lower hull... I used tin foil for light leak blocking in and around the engine area.


Weathering continues on the engine deck and exhaust vents, I didn't want to go too heavy on this area as I've seen some do... I used oils to discolour some of the panels then afterward layered a thin coat of Testors flat clear over the entire model.


Although complete., I feel I could have done certain things better (painting wise) but I went with the less is more approach and avoided the whole panel wash thing.

Nuff said, here is the completed model... photo's taken under warm lighting.


Photo's with round dish.


Cheers

Offline Tamer

  • Administrator
  • Grand Admiral
  • *
  • Posts: 37694
  • Feedback: +204/-0
  • Gender: Male
  • He who is one with the Walker
Re: My Star Wars
« Reply #24 on: June 13, 2019, 06:20:41 AM »
Talk about one awesome project. Wow, wow, wow!

Off to share. The attention to the smallest detail here really pushes this project into the next level.

Offline jkno

  • Dracula's Neighbor
  • Admiral
  • *
  • Posts: 2297
  • Feedback: +42/-0
  • Gender: Male
  • Dracula's Neighbor
    • Deviant
Re: My Star Wars
« Reply #25 on: June 16, 2019, 02:58:34 AM »
Great job on the Falcon! Very cool
Collecting has the permanence of herpes, it mutates, but doesn't go away
My collection
Trade Feedback

Offline rastanz

  • Darth Wannawanga
  • Cadet
  • *
  • Posts: 31
  • Feedback: +0/-0
  • Gender: Male
  • All Hail the Empire!
Re: My Star Wars
« Reply #26 on: November 09, 2019, 09:48:19 AM »
Talk about one awesome project. Wow, wow, wow!

Off to share. The attention to the smallest detail here really pushes this project into the next level.

Thank you, it was a fun build.

Great job on the Falcon! Very cool

Thank you for your comment.

Offline rastanz

  • Darth Wannawanga
  • Cadet
  • *
  • Posts: 31
  • Feedback: +0/-0
  • Gender: Male
  • All Hail the Empire!
Re: My Star Wars
« Reply #27 on: November 09, 2019, 10:51:16 AM »
Hey everybody, hope all is well... I've been away for work and real life adult stuff and have had barely any time for my hobbies, but I'm back again with another mod addition to a previous mod on a couple of my 1/6 scale figures.

Anyway...

First up is one of my custom kitbashed 1/6 Sideshow/Hot Toys Darth Vader figures, I decided to give this guy an upgrade of lighted parts (chestplate & belt boxes) and also treat him to a nice brand spanking new TESB diorama stand with fancy little working lights (nope, I didn't build it) as well as suiting him up with a new Hot Toys body suit, tunic and cape.

Here's a before shot of Franken-Vader and some pictures of his new parts (chestplate & belt boxes) and his new stands.


Batteries inserted, powered on for lighting test... passed.


Vader stand 1.0


Vader stand 2.0 TESB


The Hot Toys cape and tunic update... although the Sideshows cape and tunic are great, I've always thought they looked kinda stiff and frumpy, they're also quite a mission to futz with for perfect posing. The Hot Toys (TESB deluxe version) on the other hand is a step up in quality, both the cape and tunic are beautifully made and drape very well due to their weight and the material they're made from which resembles a rayon like fabric.


Starting with removal of the head sculpt then a complete strip down of the figure and maintenance check on the body for any loose or damaged joints... with all the upgrade parts laid out I'm ready to start redressing this guy.


With the new body suit, vest with chestplate and cod piece on, I can now replace his tunic, belt, chest and shoulder amour, boots and gloved hands... the battery box for the chestplate is tucked away behind him which is mounted to the strap of his cod piece.


All that's left is to put his cape back on and pop on the head sculpt... and here he is all nicely upgraded.


It was quite a simple upgrade for I didn't have to do any major modifications, just and easy swap... next up is Luke head sculpt upgrade and swap.


Offline rastanz

  • Darth Wannawanga
  • Cadet
  • *
  • Posts: 31
  • Feedback: +0/-0
  • Gender: Male
  • All Hail the Empire!
Re: My Star Wars
« Reply #28 on: November 09, 2019, 11:21:43 AM »
Luke head sculpt upgrade & swap...

Bought a couple of head sculpts during my travels, a TESB 2.0 and a ROTJ Luke (both with movable eyes) for a minor upgrade on two of my 1/6 figures, one being the Bespin version of Luke and the other, well, I haven't decided on yet but the head sculpt that I will be replacing on Bespin Luke I will be swapping over to X-wing flight suit Luke.

Here are the head sculpts and the figures they'll be mounted on...


Started with the standard head removal and complete strip down of the Bespin figure, had my handy spare parts box ready for I had further modifications to tackle before I could mount the head. I had to change the neck plug ring so the head would fit, plus I also had to cut away a bit of the tension spring that holds the neck plug in place or the figure would've suffered from giraffe neck ;D


Here's an easy work around for installing boots over long trouser legs without them bunching up awkwardly at the brim of the boot...

What works for me is I pull the end of the trouser legs down so it covers the heel of the foot then tightly wrap it around the ankle (left or right, it doesn't matter) then as I slip the boot on, I turn it slowly at the same time in the direction of the trouser leg wrap, kinda like screwing on a lid, taking note of which direction the foot and the toes are facing so I can finally pop the foot into place...

Once done, you can rotate it back the opposite direction maybe half a turn to line your seams up, from there you can futz around with it to get it where you want.


After the redress on Bespin Luke, I then proceeded to swap out the head sculpt on the X-wing flight suit Luke with the head I removed from the Bespin Luke figure...

This was easy for it was only a matter of popping the old head off and plugging the replacement in, didn't have the need to strip this figure down for it was a simple task and even the body is still in solid shape so there was no maintenance needed on the joints.


All done and I'm happy how all the upgrades / head swaps turned out.


Thanks for looking.


Offline Darth More

  • ...'cause we always want more...
  • Grand Moff
  • *
  • Posts: 4621
  • Feedback: +0/-0
  • Gender: Male
  • Darth More's Custom Workshop
Re: My Star Wars
« Reply #29 on: November 09, 2019, 12:49:12 PM »
What can I say? I like the thought of finding such quality headsculpts on your travel! You must've gotten around quite a bit recently! My guess: Japan?
No need to say it's good to see you back! When it comes to collecting action figures there is no higher level of those 1/6 scale masterpieces! (and I say that as a passionate 3.75" nerfherder)
Your work is most fantastic! Thank you so much for coming back with this massive update!
I'm going to share this with a friend of mine up in the North of Germany if I may.

Your collection is one full of unique treasures for sure!

- Philipp